Skip to content
PROUDLY MANUFACTURING IN THE USA!

Van 101

How to Disable Reverse Sensors: Upgraded Sprinter Fixes

How to Disable Reverse Sensors: Upgraded Sprinter Fixes

Upgrading a Mercedes Sprinter for off-road adventures often involves adding rugged accessories—hitch steps, spare tire carriers, rear storage boxes—that push your van’s capabilities (and silhouette) beyond the factory setup. But what happens when those upgrades mess with your Sprinter’s reverse sensors, forcing you to listen to relentless sensor pings every time you back up? Let’s get technical: here’s how to handle disabling reverse sensors on your Mercedes Sprinter van, when, why, and how to keep the rest of your safety systems intact. Rear Parking Sensors: A Blessing or a Nuisance? Mercedes Sprinter parking sensors are great—until you add a hitch step or box to the back and suddenly every reverse prompts a chorus of false alarms. Key facts: Sensor “pinging”—those false alarms—affect only about 15-20% of upfitted Sprinter vans equipped with rear accessories. The culprit? Anything that extends off the back of your van and enters the sensor’s detection field—boxes, ladders, racks—can register as obstacles. Quick Tricks: Tilting the Sensors Sometimes a simple tweak solves the problem. Try tilting the sensors first. A slight adjustment, as outlined in many FAQ diagrams, changes the angle just enough to clear the hitch or box. This works best if you have minor add-ons—but not if you’re running bulky gear. When Tilting Fails: Disabling Reverse Sensors For serious overland builds, tilting may not be enough. Here’s the pro move: Step-by-Step: Unplugging Rear Parking Sensors Lay under the rear bumper. Most Sprinters have a plastic rear bumper cover. Get beneath your van for easy access. Locate each sensor in its slot. You can feel the sensor from behind the bumper. Unplug the sensor. Pull the sensor out, disconnect the wiring harness, and slide the sensor back into its housing. Secure the exposed connector with electrical tape to protect it from dirt and moisture. That’s it—the rear sensors are now disabled. 
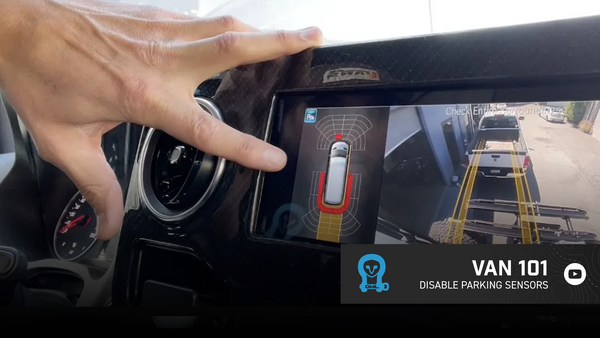
Your van will give a single beep when put into reverse. The rear sensor display will show red, indicating no active input from the rear sensors. Worth noting:The front sensors remain fully functional. You get pings up front, but if you’ve disconnected the rears, all that chirping in reverse—gone. 
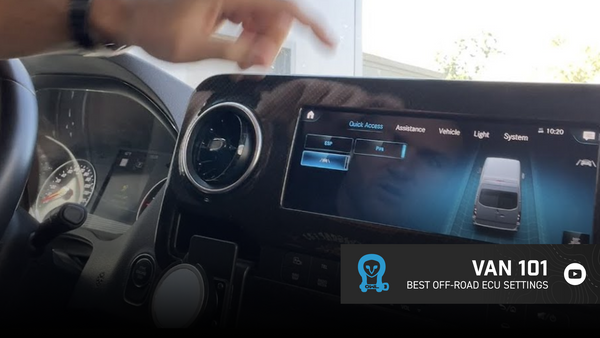
Why Disconnect Instead of Just Turning Off? There is a button on the dash to disable rear sensors temporarily. But: You’ll need to hit it every trip if you want those pings gone, which gets old fast. When sensors are unplugged, you get the benefit of a totally silent, reliable reverse—every time. Pro tip: For frequent adventure builds, unplugging is a permanent, reliable fix. Important Safety Notes: 
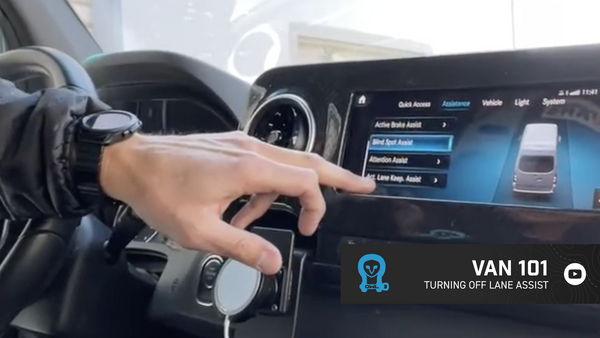
Rear parking sensors are not part of your van’s safety-critical systems. Lane assist and blind spot monitoring run independently and will continue to function—even with the rear sensors unplugged. Always double-check your mirrors (and surroundings) when reversing—extra gear on the rear changes your van’s footprint. Why Would You Want to Disable Reverse Sensors? If your Sprinter is running stock, sensors are helpful. But for off-grid or overland rigs: Accessories (boxes, steps, ladders) confuse the system—leading to false alarms. The sensors won’t recognize that the “obstacle” is actually your own equipment. Some folks worry about forfeiting safety. Reality: With intentional upfitting, you know the exact footprint of your van better than any sensor algorithm. Adventure Build Use Cases 
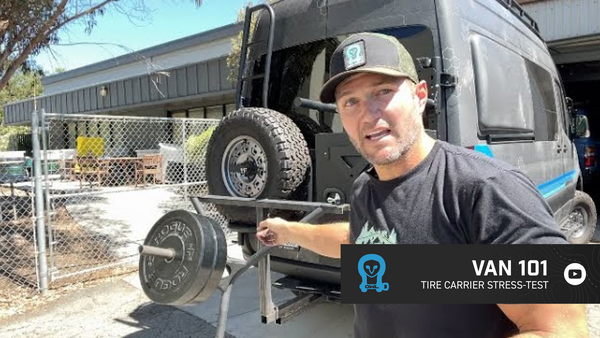
Hitch Steps and Tire Carriers You can mount an Owl Vans Hitch Step or Ladder Tire Carrier in minutes, but the sensor pinging can’t be tuned out without a hard disconnect. Expedition Rear Boxes Hauling bikes, recovery gear, or camp supplies? Rear boxes or racks practically guarantee false positives from the stock parking sensors. Long-Term Field Experience Owners report that disconnecting is the only “set it and forget it” solution after adding rear-mounted equipment. Common FAQs Will unplugging the rear sensors trigger warnings or limp mode? No major warnings—not with this basic disconnect. Your Sprinter simply won’t beep or display distance on the rear zone anymore. Can I re-enable the sensors later? Just reconnect the harness, and everything springs back to normal. Does this impact other safety systems? Rear parking sensors are not tied into lane departure or blind spot monitoring. Those features will continue working. What if I don’t want to crawl under the van? Your Sprinter’s rear sensor harness is accessible with basic tools and a willingness to get dirty. For premium installs without hassle, Owl Vans can help you integrate your off-road upgrades seamlessly. Final Thoughts:  Disabling your Sprinter’s reverse sensors is a worthwhile tweak for anyone running rear equipment. You get full utility out of your gear upgrades without annoying false alarms. Whether you’re driving deep into the backcountry or maneuvering in a city parking lot, knowing you can rely on your equipment (and not fight with unneeded tech) makes every trip smoother.
Read more
Best ECU Settings for Sprinter Vans in Sand, Snow, and Dirt

Best ECU Settings for Sprinter Vans in Sand, Snow, and Dirt

If you drive a Mercedes Sprinter and go beyond the pavement, you know that factory electronics can be both a blessing and a curse. Advanced safety features are designed keep you out of trouble on the highway, but when the trail gets loose and the terrain gets dicey, those same systems can hold you back from the adventure you're after.  Let's break down exactly how to configure your Sprinter’s ECU settings for optimal off-road performance.  Why Sprinter Control Hold You Back Off-Road Modern Sprinters come loaded with electronic stability programs (ESP), traction control, lane assist, and parking sensors. On the road, these help keep you safe and in control. Off-road, they can be more of a barrier than a benefit. Here’s what typically happens: Throttle Lag in Loose Terrain You’re on sand, dirt, snow, or gravel. You press the accelerator but the van doesn’t move. The ECU is overriding your input, trying to keep wheels from spinning and prevent loss of control. Sensors Override Manual Control Parking sensors detect rocks, branches, or earth, sometimes mistaking them for obstacle collisions. ESP and traction control prevent crucial wheel spin needed for momentum in loose or uneven terrain. Step-by-Step Guide: Disabling Sprinter Electronics for Off-Road Use 1. Locate the Mercedes “Hard Button” Find the button on your dash that looks like the front profile of your Sprinter. This is your gateway to disabling several assist features quickly and reliably. 2. Turn Off Lane Assist Lane assist is designed for highway travel. Off-road, it’s not just unnecessary, it can be a hindrance. Press the hard button Select "Lane Assist" Toggle off 3. Disable ESP (Electronic Stability Program) ESP keeps you from sliding on pavement, but off-road, you want wheels to spin as needed for traction. Press the hard button Select ESP Toggle off Note: ESP may include traction control functions, which limit wheel movement. 4. Turn Off Parking Sensors Parking sensors can interpret rocks, trees, or trail obstacles as imminent collisions, potentially halting throttle response. Press the hard button Select parking sensors Toggle off 5. Engage Four-Wheel Drive Depending on your Sprinter model, you have options: Four-wheel drive Four-wheel drive low for maximum torque Select appropriately for terrain (deep sand, snow, or steep slopes). Pro Tips for Off-Roading In Your Sprinter  Only Disable Systems Off-Road Always return stability and traction controls back ON when you’re back on the street. Your safety depends on these features in daily driving conditions. Know Your Limits Disabling electronic assists requires driver skill and experience. If you’re new to off-roading, practice in controlled environments first. Be Prepared Ensure your van is equipped with recovery gear, proper tires, and upgraded suspension if you’re tackling tough trails. By quickly disabling lane assist, ESP, and parking sensors (using your van’s hard button interface), you unlock true traction, control, and confidence in challenging environments. Common Off-Road Scenarios: Electronics Gone Rogue Throttle Limitation in Snow:ESP and traction control can prevent the wheelspin needed to break free from deep ruts or compact snow. Stuck with Parking Sensors Activated:Parking sensors may lock brakes or reduce throttle if they think you’re about to hit an obstacle—even when maneuvering at crawling speeds in rocky terrain. Lane Assist Interference:Lane assist may provide false feedback or corrective steering inputs when trail conditions mimic lane markers or edges.
Read more
How Strong Are Van Tire Carriers? Let's Destroy Them for Science

How Strong Are Van Tire Carriers? Let's Destroy Them for Science

One of the most essential upgrades for overlanders and off-road explorers is a robust rear tire carrier. There are plenty of options out there, but not all are built to tackle the rough, unpredictable conditions true adventure demands. We're not just talk about durability; let's put our carriers and competitors’ through real-world, destructive testing that separates the contenders from the pretenders. Material Selection: Aluminum vs. Steel vs. Stainless Materials are more than just marketing buzzwords. The metal used in your tire carrier is directly responsible for its longevity, performance, and weight—factors that matter whether you’re crawling rocks or hauling down graded backcountry roads. Aluminum: Lightweight, minimizing added strain on van doors and hinges Resists rust—ideal for all-weather and coastal travel Requires advanced machining expertise for structural strength Soft and challenging to weld, but, when correctly engineered, offers unbeatable strength-to-weight ratios Steel: Inexpensive, straightforward to fabricate and weld Offers good strength but adds significant weight Susceptible to rust, which can lead to long-term durability issues Stainless Steel: Resists corrosion, but not as strong as carbon steel or high-grade aluminum Marketing claims of "stainless steel" are often misleading—true stainless construction is rare due to cost and inadequate strength for critical applications In the destructive test—our aluminum-built carriers outperformed heavier steel alternatives, supporting over 230 pounds before any deflection—while comparable steel designs exhibited significant bending and eventual failure well below that threshold. Structural Engineering: It’s All About the Boxed Hinge Forget flat metal straps and flimsy attachment points. The single most critical differentiator in pro-grade tire carrier performance is how the load is supported and transferred into the van door assembly. Why Does This Matter? Sprinter doors are thin sheet metal, never intended to absorb dynamic loads from a 100-pound mounted tire. Poor design = flex, metal fatigue, and failing doors. Secure, robust carriers minimize movement and distribute forces safely. The Owl Boxed-In Hinge:We pride ourselves on our unique boxed-in hinge system—a concept borrowed straight from engineering’s favorite shape, the I-beam. Here’s why it performs: Rigid Geometry: By boxing the hinge, we create a structure that resists flex, so every slam or bump isn’t transmitted as twisting force onto your van’s door. Preloading Design: Our carriers are engineered with a slight offset so when you install them, tightening the fasteners preloads the structure. This preload reduces impact shock, drastically extending door lifespan. Minimal Third-Point Load: Many competitor carriers rely on a “no-drill” system that attaches directly to the door panel, trading fast installation for compromised weatherproofing and added stress. Our system leverages high-strength factory hinge points and eliminates unnecessary drilling, reducing long-term maintenance. Real-World Testing: Lab Numbers Don’t Lie Marketing claims come cheap. At Owl, we put prototypes and competitors through actual destructive testing—buying OEM doors from Mercedes-Benz, mounting carriers, and slamming weights until something fails. Here are the highlights from our recent experiment: Owl Aluminum Carrier: Supported 230 pounds with no bending or damage. That’s well beyond what even the largest off-road tire/wheel combo requires. Leading Competitor’s Carrier (untested steel design): Failed at only 130 pounds, flexing like a spring and transmitting damaging force directly to the door’s weakest attachment point. No Inner Door Plate Required: Owl’s boxed hinge absorbs load and impact so well that we don’t require internal steel plates—a must-have on less thoughtful designs. What That Means for You:You get a product that holds up over years and hundreds of thousands of miles of harsh use. The real-world experience confirms: Proper engineering > cheap materials and shortcuts. Installation Myths: “No-Drill” Doesn’t Mean No Hassle Many “no-drill” tire carriers seem simpler, but here’s what the testing tells us: Often requires cutting or grinding into weatherproofed door panels, trading one problem for another. Adds unnecessary flex and risk of water ingress. Owl’s mounting system is designed to preserve structural integrity and weatherproofing—making for both an easier install and a longer-lasting upgrade. Weight Matters—And So Does Strength A lighter carrier means less wear and tear every time you open the door, less sagging over time, and better performance on rough roads. By using high-grade aluminum and clever design, our carriers deliver strength at half the weight of many competitors—directly reducing stress and preserving your van’s systems for the long haul. What to Look for in a Tire Carrier: Quick Checklist If you’re vetting gear for your next adventure build, make sure your carrier ticks these boxes: Material: High-grade aluminum or proven steel, not just “stainless steel” marketing hype Boxed hinge or I-beam engineering: To ensure rigidity and load distribution Proven, tested design: Not just CAD drawings or pretty photographs Minimal door modification: To protect weatherproofing and OEM structure Preload at mounting: For impact resistance and long-term reliability No reliance on flimsy third mounting points or “springy” metal bars If you don’t see verified strength testing—or if the brand can’t show you actual results—keep looking. Final Thoughts: Demand the Best, Then Get Out and Explore At Owl, our products are build for real performance—proven in the shop, on the trail, and after hundreds of thousands of hard-fought miles. When we say our tire carriers are among the strongest, lightest, and most reliable in the industry, it’s not just a claim—it’s backed by rigorous, transparent, and sometimes destructive testing designed to keep you rolling to the remotest corners.
Read more
Quick Guide: Disabling Lane Assist on Your Sprinter

Quick Guide: Disabling Lane Assist on Your Sprinter

When your adventures take you off the beaten path, you need complete control over your Sprinter van—no distractions, no unnecessary tech nagging you when you’re carving your own lines through dirt, forest, or rocky terrain. Mercedes-Benz Lane Assist, while helpful on highways, can quickly become a frustration for those who push boundaries and blaze trails. So, let’s cut through the noise and arm you with the concise, expert advice you need: Here’s the quickest, most efficient way to turn off Lane Assist in your Mercedes Sprinter. Why Turn Off Lane Assist for Off-Roading? Lane Assist is designed for city and highway driving, where staying between the lines is essential. But on winding mountain roads, undeveloped tracks, or when maneuvering in tight spots, Lane Assist can be more hindrance than help. False warnings and unnecessary steering corrections aren’t just annoying—they can get in the way of your adventure. Full vehicle control: Essential for technical driving, tricky trail conditions, or dense urban environments. Minimize distractions: A focused driver is a safer, more capable driver—period. Beat the frustration: Lane Assist can be intrusive, especially when you intentionally need to hug curves or make evasive maneuvers. The Truth: Can You Turn Off Lane Assist Permanently? Let’s clear this up: You cannot disable Lane Assist permanently in most modern Mercedes-Benz Sprinter vans. It’s a built-in safety feature that resets after you restart your van—thanks, Mercedes. But that doesn’t mean you can’t turn it off quickly every time you hit the road or the trail. Here’s exactly how it’s done, based on our direct testing and everyday use: How Most Sprinter Owners Turn Off Lane Assist (The Long Way) If you’re new to your Sprinter's touchscreen interface, you’ll find Lane Assist buried in the vehicle menus. The common method looks like this: Tap “Home” on your touchscreen. Swipe or navigate to “Assistance.” Select “Lane Assist.” Switch Lane Assist to “Off.” Why skip this?This requires several steps. Not ideal when you’re eager to hit the trail, music’s pumping, and your hands are busy with gear. Owl's Proven Shortcut: Two-Button Solution Here’s the fastest, simplest way—no guesswork, no time wasted: Locate the Hard Buttons: On your Sprinter’s dashboard, you’ll see a set of physical (“hard”) buttons. Look for the one labeled “Van.” Deactivate Lane Assist Instantly: Press the “Van” button, then the “Lane Assist Off” switch. That’s right—just two quick taps. Return to the Home Screen: Hit “Home” to jump back to your music, navigation, or vehicle settings and get on with your adventure. Total process: Two button presses, less than three seconds. That’s efficiency you can rely on, especially when conditions demand your full attention. Recap: Why This Matters Saves Time: When every minute counts—whether you’re escaping weather, nightfall, or just maximizing trail time—quick toggling keeps your focus where it should be. Less Distraction: No screen-fumbling required. Use those hard controls and keep your eyes (and mind) on the road or trail. Repeatable & Reliable: Even though Lane Assist resets every time you turn your van on, muscle memory makes this a non-issue. Unleash Your Sprinter Van’s True Potential Don’t let Lane Assist dictate where you can or can’t go. With this two-step method, you’re always ready to adapt—no matter how wild the journey gets.
Read more
A Beginner’s Guide to Sprinter Van Tires, Wheels, Offsets, and Spacers

A Beginner’s Guide to Sprinter Van Tires, Wheels, Offsets, and Spacers

When it comes to building a van ready to handle any terrain, few upgrades make a bigger impact than your choice of wheels and tires. Whether you’re prepping for an overland adventure or optimizing your daily driver, every detail matters—diameters, load ratings, offsets, and the all-important question: What fits my Sprinter?  Understanding Tire Sizes: Metric vs. Standard For Sprinter vans, the tire sizing world can seem like a maze. Here’s the breakdown: Standard Sizing (e.g., 37x12.5R17): Refers to overall diameter x width in inches, with R representing the rim size in inches. Example: “37” is 37" tall, “12.5” is 12.5" wide, and “R17” fits a 17" rim. Metric Sizing (e.g., 275/70R17): Widely used for Sprinters. “275” is the tread width in millimeters, “70” means the tire’s sidewall height is 70% of the tread width, and “R17” is the rim diameter in inches. Why choose metric? Sprinters primarily use metric sizing. For reference, 25mm = 1 inch, so you can quickly translate if needed. Quick Reference Example: 275/70R17: 275mm wide tread Sidewall is 70% of 275mm (approx. 192.5mm) Fits a 17" rim Load Ratings: Don’t Skimp on Strength Sprinter vans aren’t light—especially after you add gear, water, and adventure mods. Each tire’s load rating is critical: Look for Load Range D or higher. These tires can handle up to 3,525 lbs (1600 kg) per tire, which is plenty of coverage for a loaded sprinter. Always leave a margin: If your van weighs 10,000 lbs fully loaded, expect each tire to carry ~2,500 lbs. Pro Tip: Low tire pressures for off-roading also lower the load a tire can reliably carry. Overbuild for safety and longevity. Sizing Up: What’s the Biggest Tire That Fits My Sprinter? This is the question we hear most. Here’s the reality: Chassis matters: VS30 (2019+) vans have smaller wheel arches than older NCV3 vans. Sensor Limitations: 275/70R17 is the largest practical size for a 4WD VS30 Sprinter while retaining full function of features like adaptive cruise and collision avoidance. Go bigger? Yes—but expect serious trimming. Tires up to 35" require cutting/drill work (fender trimming, mud guard relocation, etc.) and may disable safety features due to electronic speed mismatches. Pro Tip: Consult the tire fitment guide in the Owl Vans FAQ for year-specific recommendations. Our team is always ready to walk you through what works for your platform. Tread Patterns: Choose for Your Adventure Your tread matters just as much as size. If your van sees off-pavement action, look for tires with sidewall tread—when aired down, you'll gain a wider contact patch and more bite over obstacles. Street/Highway Tread: Closely spaced, low-profile lugs. Great for quiet performance and long life on pavement. All-Terrain (A/T): Versatile. Blocky lugs and moderate spacing for mixed on/off-road. Mud-Terrain (M/T): Widely spaced, aggressive tread for maximum off-road grip, mud, and rock. Sidewall lugs help when aired down off-road. Airing Down for Off-Road: Why Sidewall & Wheel Size Matter Big wheels might look cool, but function matters. A plush sidewall also protects your wheels from trail hazards and gives you the ability to ‘air down’ for tough tracks. Larger rim = smaller sidewall—bad news for traction. Prefer a 17" rim (not 18", 19", or 20"); it leaves ample sidewall for flex, cushion, and grip when running low pressures off-road. Wheel Types: Regular vs. Beadlock Regular Rim: Secures tire bead with rim flange; safe for daily use, easy to service. Beadlock: Physically clamps the tire bead, locking it between a steel or alloy ring and the wheel. Lets you run very low PSI off-road without fear of unseating (“popping the bead”) NOTE: Beadlocks are not DOT-approved for highway use; run at your own risk and check local laws. Offset, Backspacing & Spacers: Perfecting Your Stance Offset: Distance from wheel’s hub mounting surface to centerline. More negative offset = wheels stick out (wider stance, more track width). Backspacing: Measured from back rim edge to hub mounting surface. Why It Matters:  A wider stance lowers your center of gravity and stability off-road. Limits for Sprinters: Don’t go too wide—you’ll hinder sliding door operation and risk rubbing. Wheel Spacers: Safely change track width, but always use hub-centric spacers. Never rely on lug-centric (unsafe for heavy vans).     Lug Nuts, Bolts, and Changing Wheels Factory wheels: Dome-style lug bolts. Most aftermarket wheels: Cone-style lugs. Never mix and match—ensure the bolts you're using match wheel seat profile exactly. Pro Tip: Our Sprinter Wheel Hanger Stud makes wheel swaps (especially those that have difficulty resting properly on the center hub) much easier. It's a small accessory with a big payoff for DIYers and pros alike. Putting It All Together: Pro Recommendations Tire: 275/70R17 All-Terrain (e.g., BFGoodrich KO2) is a proven performer for Sprinter 4WD vans—excellent on-road manners, solid off-road bite. Wheel: 17" with appropriate offset for your van and tire combo. Check fitment for sliding doors and suspension travel. Spacers: If needed to clear brakes or widen stance, use quality hub-centric spacers only. Mud Guard Trimming: Expect to trim or relocate mudguards for anything taller than 32" tires.
Read more
Everything You Need to Know About Off-Road Lights | Owl x Triple-R

Everything You Need to Know About Off-Road Lights | Owl x Triple-R

When you build out your dream adventure rig—whether that's your Van or Grenadier—you want more than just Instagram-worthy gear. You want reliability, performance, and tailored solutions for real-world trails. That’s especially true with your lighting setup. Whether you’re navigating dusty desert tracks, wetlands with fog, or simply pulling long miles down empty highways, your lights should work seamlessly and efficiently. Let’s break down how to choose off-road lighting that’s as tough as your journey, pulling from the essential insights with Ben from Triple R.  Why Off-Road Lighting Matters If you spend any serious time off the beaten path, you know quality lighting is about safety, visibility, and minimizing fatigue—not just aesthetics. Factory headlights, even on premium adventure vehicles, are rarely engineered for true backcountry use. Here’s what separates the pros from the pretenders when it comes to off-road lighting selection. Understanding Lighting Tech: 1. Lumens: The Real Measure of Brightness Lumens are the actual amount of light emitted from a source. Here's why it matters: higher lumens = more light output. But more isn’t necessarily better—beam control and efficiency are just as crucial. Pro Tip: The efficiency of the LED matters too. A high-end LED will deliver more lumens per watt, maximizing actual usable light. 2. Color Temperature: How To Choose Color temperatures is measured in Kelvins (K). Lower values (e.g., 3000K) mean more yellow/amber light; higher values (6500K) mean a blue/white. Optimal range for off-roading and fatigue reduction: Around 5,000K. This mimics natural daylight and reduces eye strain, which matters if you’re spending long hours on the road or crawling at night. Yellow/amber: Cuts through fog, dust, and inclement weather—vital for harsh environments (think Baja silt beds or European pea soup fog). 3. Beam Pattern: Why Spread & Punch Both Count Wide Spread: Crucial for spotting wildlife or hazards lurking outside your lane. Long Distance: Needed for high-speed travel and advanced warning of obstacles on open tracks. When outfitting your rig for optimal lighting—you'll want to keep these two things in mind. The best setups use both—a broad, even spread paired with a concentrated “punch” beam down the middle. Triple R Highlight: Integration and Build Quality The best lights combine quality materials with seamless integration. Which is why Triple R beats out the other competitors. Here's why we choose their lighting over many other competitors:  All manufacturing is completed in-house (in the UK) for absolute quality control. Clever engineering such as rear-facing LEDs projecting into high-precision reflectors for better beam control and maximum usable light. Bracketing fits discreetly behind OEM grilles—maintaining the clean look of top-tier vehicles like the Sprinter and Grenadier. Simple, straightforward installation. SAE vs. Non-SAE: What’s Legal and Why It’s Important SAE-Approved Lighting: Street legal in the US. Designed to prevent glare, focus the beam pattern, and avoid blinding other drivers. Ideal for fog and auxiliary lighting you’ll use on-road or in mixed company. Non-SAE (Off-Road): No restrictions on beam pattern or intensity. Delivers maximum output and flexibility—best reserved for true off-grid or trail-only environments. Many premium lights (like Triple R’s latest models) now offer dual-functionality: switch between legal SAE mode and off-road high-output at the flick of a switch or the removal of a small cap. Owl Vans Pro Tip: In strict states like California, an SAE marking on your lights can save you from law enforcement hassles, and means you don’t need to keep lens covers handy on-road. Amber vs. White: Choosing the Right Beam for Your Terrain Yellow/Amber Beams: Superior for cutting through fog, dust, snow, and heavy rain by reducing backscatter and reflection. White Beams: Offer maximum brightness and clarity in dry, clear conditions, and are ideal for general high-beam usage. Some advanced lights offer both—you can toggle between amber fog and white high-beam modes, maximizing utility in every condition. Practical Recommendations for Your Setup So what should you look for? Here’s the expert checklist: Day/Night Versatility: Look for setups around 5,000K for minimal eye fatigue and best visibility. Balanced Spread: Prioritize both wide and long-distance output—either via a combo light bar or by pairing dedicated wide and spot beams. Amber/Yellow Functionality: Absolutely essential for anyone traveling dusty trails or in climates prone to fog. Factory-Style Integration: Mounts, brackets, and lights that follow body lines and can be cleanly installed behind or within grilles. SAE Compliance: Especially if your adventures include plenty of on-road driving—avoid tickets and unwanted attention. High-Quality LEDs & Reflectors: Efficient, reliable, and rugged. This reduces battery draw and ups your real-world visibility. Why Lighting Quality (and Placement) Matters Beyond just specs, here’s why pros pay for top-tier lighting: Control & Safety: Advanced reflector designs precisely focus the beam, meaning you see more and don’t blind oncoming traffic. Reduced Fatigue: True daylight-mimicking color and minimal blue light means less strain—especially on marathon trips or convoy runs. Durability: Off-road-focused designs withstand vibration, water, and abuse—essential for remote backcountry travel. Conclusion: Elevate Every Night Mile Your off-road adventure is only as good as your vision—literally. Quality lighting isn’t a luxury, it’s a trail-tested necessity. By understanding what matters—from lumens to integration—you guarantee more confidence on every run, better safety for you and your crew, and a rig that stands out for all the right reasons.
Read more
Off-Grid Safety: Setting Up Your iPhone Emergency SOS Satellite

Off-Grid Safety: Setting Up Your iPhone Emergency SOS Satellite

If you’re deep into the world of van life, off-grid camping, or remote overland exploration, you know that real adventure comes with real risk. The farther you go, the more vital it is to have a solid backup plan for emergencies. Here’s something every adventure driver and explorer needs in their toolkit: your iPhone. Specifically, if you’re carrying an iPhone 14 or newer, you have access to the Emergency SOS via Satellite feature—a literal life-saver when you’re out of cell range. Let’s break down exactly how this tech works in real-world scenarios and why it’s essential for anyone venturing far off the grid. Why iPhone Satellite SOS Is Essential for Van Life & Off-Road Overlanding Off-grid, off-road adventurers frequently lose cell signal. Remote trails and wild campsites don’t play nice with mobile networks. Emergencies don’t care about connectivity. A broken leg, sudden illness, or mechanical breakdown far from help requires serious contingency plans. Satellite connectivity bridges the gap. When cellular networks fail, your iPhone’s direct link to satellites lets you call for help—no tall antennas or bulky hardware required. Step-by-Step: How to Initiate Emergency SOS via Satellite (iPhone 14+) Before you hit the road or trail, learn this process before you actually need it. As John from the My Space channel shows in the demo, preparation is key: 1. Prepare Your Device (Before Departure): Access your iPhone’s settings. In the search box at the top, type “SOS.” Tap Emergency SOS. Scroll down to Try Demo to familiarize yourself. 2. Understand Satellite Connectivity Unlike classic satellite phones, the iPhone uses your motion as its antenna; you don’t need a giant, protruding dome. You must turn off your cellular connection for satellite SOS to engage. The phone will prompt you when needed. 3. The Demo Mode — Practice Makes Perfect Try practice mode while at base or camp, not during a real emergency. The demo walks you through sending a mock emergency: you select your issue (injured, lost, crime witness). The system sends your location and any medical ID attached to your device. 4. Making Contact During a Real Emergency If you lose cell and WiFi, your phone will show “SOS” and a small satellite icon. To connect, hold your phone and follow on-screen instructions—move until you find the satellite, aligning the icon in the center of the circle. Keep messages short and clear: “I’m injured, need rescue,” rather than lengthy stories. Add critical info: number of people, medical conditions, local terrain obstacles, or if someone in your party is seeking help in a specific direction. 5. Set Up Your Medical ID Crucial for first responders. Input blood type, allergies, medical conditions—could save precious time. 6. What Gets Sent Your GPS location. Status (injury, crime, lost, etc.). Medical ID (if set). Any added details—like company size or pets with you. Technical Realities Every Adventurer Needs to Know Satellite connectivity is slower and more finicky than cellular. Don’t expect rapid-fire texting; expect brief exchanges. Environment matters. Heavy canopy, deep canyons, and inclement weather can affect the speed and reliability of your connection. Your position is key. Move as necessary to get a clear line-of-sight to satellites. The phone guides you with simple graphics. Pro Tip: Practice at home or campsite first, so you feel prepared and ready if disaster strikes. Integrating Emergency Prep Pre-trip checklist: Alongside fuel, water, and recovery gear, confirm your iPhone is charged and medical ID is updated. Run through a demo before each major trip to stay sharp. Inform travel partners about the SOS feature, so anyone can call for help. Pair with communications upgrades: While satellite texting saves lives, pairing with onboard comms (CB, HAM, GMRS) offers more versatility for group travel. Summary: Know Your Tech—It’s Part of Your Rescue Kit Even the best off-road hardware is only part of the equation—your iPhone’s Emergency SOS via Satellite makes your expedition safer and smarter. Don’t wait for disaster to try it for the first time. Set it up, practice, and make it as essential as your traction boards and recovery kit.
Read more
The Ultimate Winnebago Ekko Build: Owl Teton Edition

The Ultimate Winnebago Ekko Build: Owl Teton Edition

When it comes to pushing the boundaries of off-road capability, Owl stands at the forefront of innovation. For adventure seekers who demand unrivaled performance, ruggedness, and individuality in their rigs, the Winnebago Ekko: Teton Edition is a game-changer that redefines what’s possible with the Winnebago Ekko platform. Forget half measures. If you want a trail-hungry, family-ready adventure machine that puts EarthRoamers and Storyteller models to shame—at a fraction of their price. This is where your journey accelerates. From Vision to Trail: Why the Ekko Teton Edition Exists Owl’s journey with the Ekko began by setting a bold challenge: build a rig with true off-road capability, real livable space, and head-turning style—without the huge footprint or sticker shock of ultra-high-end competitors. The goal? Deliver a van that could take on big names like EarthRoamer or Storyteller, while remaining accessible, drivable, and fully outfitted. The result is more than just a project. Thanks to overwhelming demand at shows like Big Bear and Ventura, Owl and Winnebago are partnering for a limited run of these exclusive Ekko builds—the Ekko Teton Edition. Expect a vehicle that dominates on the trail, thrives in the forest, and never blends into the ordinary. Next-Level Off-Road Upgrades—No Compromises Let’s break down how this Ekko goes from mild-mannered RV to all-terrain monster. Each modification is purposeful—there’s no fluff here, just battle-tested upgrades that matter in the wild. 1. Super Singles: The Foundation of Off-Road Authority Factory Winnebago Ekkos roll out as dualies—fine for highways, but a liability when you want ground clearance and tire performance on gnarly trails. Here’s why Owl ditches the stock setup: Super Single Rear Conversion: Dually wheels restrict tire size and trap rocks—bad news in technical terrain. Super singles, with their massive 123-degree offset (a first-ever design from Owl), push the wheels out to perfectly fill the Ekko’s arches. 35-Inch Tires: Nearly 35-inch 315s change the attitude and stance, increase ground clearance, and vastly improve off-road rubber-to-dirt traction. This is how you get up trails that dually vans simply can’t attempt. Key Benefits: Massive increase in ground clearance Eliminate rock-trapping between dual tires (sidewall protection) Aggressive stance for real stability off-camber 2. Suspension That Eats Rough Roads Alive No serious build ignores suspension. Factory Sprinters and Ekkos are notoriously under-sprung—especially once you’re loaded for adventure. Owl’s solution: Van Compass 6.3 Lift with Rally Struts: A full two-inch lift on top of correcting factory spring sag. Adjustable damping and piggyback reservoirs control rebound and maximize comfort and articulation. Fox/Falcon Rear Dampers and Heavy-tune Leaf Springs: Built to handle weight, rough terrain, and sudden dips without bottoming or swaying. Result: The difference is dramatic—8 inches of rear lift over factory “sag,” and canyon-carving road manners that blew away expectations, even at 11,000+ pounds. 3. Exterior Armor and Utility There’s substance behind the aggressive stance: AFN Ridgeline Max Front Bumper: Full-coverage, exclusive to Owl, designed to match Ekko’s body lines. Integrated 12,000lb winch, custom fairlead and shackle system (zero droop, no limp cable), and space for modern safety sensors. Rear Bumper/Carrier System: Prototype shows promise—expect flush-mounted Baja Designs S2 Pro recovery lighting, robust tire carrier, and frame-rail mounting for serious load capacity. Tubular Ladder Option: For those who want real utility, not RV garnish. 4. Camper Upgrades That Matter This isn’t just a trail rig—it’s a livable, four-season escape pod engineered for reliability and convenience: Diesel Timberline Hot Water + Heating: Propane is out (except as backup); diesel heat means less worry, more runtime, and ultimate cold-weather performance. Battery and Generator Tweaks: Electric upgrades minimize generator dependency, keeping power renewable and silent. Improved Step-In Height: Custom cab step drops 2.5–3 inches for easy entry (especially important post-lift). 5. Signature Style and Stealth No detail left to chance: Exclusive Wraps: OD green with topo and forest graphics (plus blue and gunmetal options), totally unique to Owl. Rugged in appearance—but blends seamlessly into natural surroundings. Optional Pop-Top: Go stealth, or maximize vertical space for families and longer expeditions. 6. Trail-Tested Drivability Every mod here is proven—not just in the shop, but on legendary climbs like the route to Big Bear. The Ekko Teton Edition handles with true confidence, carving tight canyons and rough tracks with ease. Expect Sprinter reliability, but with far more clearance, protection, and handling than Mercedes ever imagined. The Verdict: Who Is the Ekko Teton Edition For? Off-road adventurers seeking real terrain capability without jumping to million-dollar expedition trucks Families who need true livable space on the trail (not just a rolling box on wheels) Gearheads who demand performance upgrades with real-world trail impact Anyone who wants to stand out—whether in the wild, at camp, or on the highway Every piece of this limited edition build reflects Owl's relentless pursuit of the ultimate off-road adventure vehicle. It’s not a concept. It’s available now (in limited numbers) through Owl and Giant RV. Insisting on real upgrades—like super single conversions, Van Compass suspension, premium armor, and smart camp systems—is what makes this not just a showpiece but a true trail-ready companion.
Read more
Van Safety: Must Have Satellite Communication Devices

Van Safety: Must Have Satellite Communication Devices

Serious overland travel demands more than rugged tires and rooftop tents. If you’re pushing your vehicles beyond the city lights and exploring remote trails, your most critical upgrade might not be gear you can see or touch every day. It’s the gear you hope you’ll never need—but when you do, nothing else will do. Satellite communication is critical when going off the beaten path and if you want to push your rig (and yourself) farther, read on. These aren’t just “nice to haves”—they’re literal lifelines. The Adventure Reality: Safety First—Always Let’s cut to the chase. Having a tricked-out van or a beefy 4x4 can create a false sense of invincibility. The best explorations can go wrong—fast. John, Owl Vans’ host, shares in the Critical Adventure Van Safety Gear video about seasoned adventurers in Death Valley who met tragedy after simple mechanical issues stranded them far from cell service. The difference between life and loss? Access to emergency communication. No Signal, No Service, No Problem: Enter the Satellite Communicator Cell signal dies quickly as you leave paved roads. That’s where dedicated satellite devices—like the Garmin InReach series—become non-negotiable: Garmin InReach: True satellite communication (not cell signal boosters or mesh apps) SOS functionality: Immediate distress call anywhere on Earth Two-way texting: Check in with family, coordinate with rescue, or connect with your group—even without cell towers Lightweight, versatile: Toss it in your pack for hikes, rides, or side adventures Flexible plans: Emergency-only plans are affordable, but frequent travelers can opt for expanded messaging Bottom Line: If you can afford to build or buy an adventure van, you can (and should) afford real off-grid communication. Too many overlanders overlook this—until it’s too late. Beyond Safety: Smart Navigation for True Off-Roaders Once you’ve squared away emergency comms, it’s time to look at smarter, more capable navigation. Forget standard car nav—it’s time to go bespoke. Garmin Overlander: Android-based, rugged tablet: Tough enough for the trail and designed for off-road Preloaded U.S. topographic maps and 4x4 trails: Know before you go—no accidental sketchy routes Integrated with backup camera (wireless): Always-on rear view, not just when reversing—crucial for Sprinters and Revels with poor rearward visibility Customizable split screen: See your route and rear cam simultaneously Pitch, roll, altimeter, barometer, compass: Real-time environmental metrics for actual adventure—not just mall crawling Accessory integration: Control auxiliary lighting and more, keeping your dash clean and functional If you’ve outgrown MapQuest and mainstream nav apps, this is a real leap forward. Real Scenarios: Why This Matters Not convinced? Consider these real-world moments pulled straight from the trail and John’s experience: You’re deep in a national forest with no bars, and a storm hits. A tire blows out, or your group separates. Are you ready? An accident happens—a crash, injury, or medical issue far from help. Your van is your lifeline, but only if you can call in backup. Finding epic trails off-the-grid: Relying on crowd-sourced apps or paper maps can end poorly. The Overlander gives you verified, granular trail data—plus topographic context and elevation changes. Fewer “sketchy route” surprises. Pro Tip: Satellite communication isn’t just for drivers. Hikers, bikers, and anyone venturing away from the van should carry a personal, pocket-sized device. No one expects to need a rescue until they do. What About Other Communication Options? A word of warning from John: Cell-boosting devices, mesh radios, or network extenders help—but only where there’s still some signal. True satellite communicators (InReach, satellite phones) are the only reliable, go-anywhere option. Don’t cut corners on this one. If you’re running group trips, connecting your Garmin Overlander and InReach allows seamless, off-grid team messaging. No more “dropped off the map.” What Every Adventure Van Needs Before Going Off Road 1. Satellite Communication Device Always available, anywhere you roam Options for both van-based and personal carry Absolute must for solo travelers, families, or anyone headed beyond urban cell towers 2. Dedicated Off-Road Navigation Topo maps, trail info, real-time stats Integration with backup cameras and auxiliary electronics Essential for safe exploration off the beaten path
Read more
Why Your Sprinter Van Needs a Suspension Upgrade

Why Your Sprinter Van Needs a Suspension Upgrade

When you’re pushing your Mercedes Sprinter to the edge—whether carving down dusty trails, carrying adventure gear, or traversing backcountry roads—the only thing between your van and the unpredictability of nature is your suspension.  We know the thrills and challenges of off-road adventure, and we’ve learned firsthand why a proper suspension system isn’t just an upgrade—it’s mission-critical. The Hidden Weakness: Factory-Installed Leaf Springs Let’s be blunt: Mercedes builds an incredible van, but even the most innovative platforms have their soft spots. Most stock Sprinter vans (and even high-end builds like the Storyteller Overland series) suffer from one major oversight—under-spec’d rear leaf springs. On the trail—John quickly noticed a critical performance issue: “While the Storyteller vans are fantastic vans, they are still at risk of the problem of Mercedes... putting too small a leaf spring on there. So this is why you upgrade your suspension and put leaf springs in.” This isn’t just about comfort; inadequate rear leaf springs can tank your van’s stability, safety, and overall driving experience both on- and off-road. What’s Actually Happening Underneath If you look under a fully built-out van, you might see what John describes: the stock leaf spring straining under load, with the suspension so compressed the bump stop is nearly touching the axle—no gap left for movement. In his words: “The leaf spring is basically completely collapsed, and you’ve got bump stop on bump stop. That should not be that way.” This collapsed setup means the suspension can’t do its job. You lose critical travel—the amount your suspension can move to absorb bumps and irregularities. Why Suspension Travel Matters Off-Road Imagine crawling up a rocky hill and hitting a rut: if your suspension is maxed out (bump stop sitting flush), there’s nowhere left for the wheel to travel. The tire lifts off the ground, traction is lost, and control goes out the window. John gave a real-world example on the trail: “We would go over small bumps and their rear tires were getting completely airborne, whereas ours were staying on the ground.” Losing tire contact isn’t just rough on your van; it’s a safety concern. Suspension travel—the ability for wheels to move up and down—keeps tires glued to the trail, maximizing grip, stability, and your confidence behind the wheel. The Difference an Upgraded Suspension Makes So what does the right setup look like? John provided the proof under his own rig: “Now you see a proper bump stop. You see the difference there? That’s got two, two and a half inches of suspension travel. So that right there is why our van was able to maintain much more stability off road than the other van, which basically has no suspension travel whatsoever.” Here’s what you gain with upgraded rear leaf springs and suspension components: Extra Travel: More space between bump stop and axle, meaning the suspension can actually work. Improved Stability: Wheels stay in contact with the ground over uneven terrain. Load Handling: Optimized suspension keeps your rig level and responsive, even when fully loaded. Ride Comfort: Smoother over bumps, less risk of “bottoming out” or harsh impacts. Spotting the Signs: Does Your Van Need Suspension Upgrades? Many Sprinter owners don’t realize they’ve outgrown the stock suspension until it’s too late—usually when handling gets sloppy or you hear odd clunks and rattles. Watch for these red flags: Constant Sagging: Rear end of your van visibly sits lower, even unloaded. Full Compression: Little to no gap between leaf spring and bump stop. Rough Ride: Van bottoms out on potholes, speed bumps, or when hitting dirt tracks. Loss of Traction: Rear tires leave the ground over moderate bumps or washboarding. If you’re running heavier builds (kitchen setups, gear storage, water tanks) or regularly pack your Sprinter for long excursions, stock suspension simply won’t keep up. Why Suspension? Our suspension upgrades for Sprinter vans are engineered for serious adventure: Heavy-Duty Leaf Spring Packs: Designed to carry fully-built rigs and stay compliant across tough terrain. Enhanced Shock Absorbers: Pair perfectly with upgraded springs for added damping control. Custom-Tuned Kits: We match your van’s build and use case—no off-the-shelf guesswork. Proven on the Trail: Our gear gets torture-tested where it counts, by vanlifers and pros who don’t settle for compromise. Thinking about your own upgrade? Here’s what you’ll experience with premium suspension: Dramatically improved handling, regardless of load Confident off-grid capability—no more “floating” or fishtailing on loose ground Longer lifespan for your van (reducing wear on bushings, bearings, and chassis) Greater safety, especially when avoiding sudden obstacles or rough conditions Making the Upgrade—What You Should Know Installation: Most suspension upgrades can be completed by a skilled shop in a day; Owl Vans offers pro install service at our certified locations. Compatibility: We offer suspension solutions for all Mercedes Sprinter models—and will soon have options for other adventure vehicles like the Ineos Grenadier. Support: Every upgrade comes with technical support and the guidance you need to keep your van adventure-ready. Ready for the Trail? Don’t Settle for Stock Your van is your ticket to the wild, and your suspension is the foundation that makes everything possible. Factory leaf springs were never designed to handle big builds, tough terrain, or the pull of true off-road adventure. If your Sprinter is loaded up and hitting its limits—or if you’re ready to push its capabilities to the edge—don’t wait for stability or safety to become an issue.
Read more
The Right Way to Spool a Winch Line on Any Off-Road Vehicle

The Right Way to Spool a Winch Line on Any Off-Road Vehicle

When you outfit your Sprinter Van or Grenadier for off-road adventure, a reliable winch is mandatory equipment. But even the most high-end winch setup is only as strong as the line you spool onto it. In this comprehensive, no-nonsense guide, we’re breaking down everything you need to know about properly spooling a synthetic or steel winch line, drawing directly from our hands-on process with the GP Factor Grenadier: Hidden 12.5K Winch Kit. Whether you’re new to overlanding or a seasoned trail explorer, these techniques will maximize reliability and safety when the going gets tough. Why Proper Winch Line Spooling Matters A winch is only as reliable as the rope or cable wound around its drum. Here’s why meticulous spooling is critical: Prevents Gaps: Gaps in the winch wind can allow rope to slot in under heavy load, risking irreversible “bird-nesting” and rapid degradation. Maintains Strength: Properly tensioned wraps ensure the line doesn’t lose rated pulling capacity prematurely. Promotes Safe Recovery: Well-laid winch lines reduce the risk of sudden failures and make subsequent recoveries far more predictable. Synthetic ropes have become the preferred upgrade among off-roaders for their lighter weight and safer failure characteristics. We stock (and install) premium winches including upgraded synthetic options designed for adventure vehicles. Step-By-Step: Spooling a New Winch Line 1. Gear-Up and Plan the Setup You’ll Need: Two people (recommended for control and safety) A stationary anchor (tree, bollard, or recovery point) Recovery kit (tree saver, soft shackle, gloves) Your vehicle with winch installed (i.e., GP Factor Hidden Winch on the Ineos Grenadier) Pro Tip: Always wear gloves when handling winch line—whether synthetic or steel. 2. Anchor and Prep the Winch Secure a tree saver strap or loop your line around a sturdy, immovable object. In our setup, we used a parking bollard for demonstration. Connect your soft shackle (ideally UV-protected, like the ASR model) to the anchor. Avoid sharp corners or non-radius hooks when using soft shackles, as abrasion can cause failures. Synthetic Rope Note: Synthetic ropes degrade rapidly under UV exposure. Invest in a winch cover and keep those last drum wraps shaded—especially if you adventure in sun-drenched environments. 3. Disengage and Pull Out the Winch Line Disengage your winch’s free-spool function. Walk out the entire winch line, keeping it clear from vehicle tires and obstacles. If needed, flick it over potential hazards so it remains visible and tangle-free. Warning: Only leave a single safety wrap on the drum—never spool completely off the winch. At this stage, you’ll likely notice a red safety indicator (on some ropes) as you approach the line’s end—this is your sign to stop and prep to re-spool. 4. Tensioning: The Key Step Switch the winch into engaged mode. Attach the winch remote, and check the vehicle is in neutral (for Grenadier) or the proper gear as required by your make. One person should slowly winch in while the other gently drags the vehicle’s brakes—this adds necessary tension for a tight, gap-free spool. Advanced tip: If on an incline, let gravity help maintain natural resistance. Lay the rope side-to-side evenly on the first wrap—this is where most power is generated, so it’s essential not to leave gaps. Safety Reminder: Never put your hands or loose clothing near the drum while winching under tension. Always stand clear of the line path. 5. Spool Back and Forth—Layer by Layer Continue winching in the line, meticulously guiding each new layer across the drum: As you build up wraps, traverse the drum evenly in both directions. Maintain even tension the entire way. If you spot a gap, stop and correct by respooling as needed—synthetic line is forgiving here, letting you adjust without “bird-nesting.” For the last 8–10 feet, gentle hand tension is sufficient. Synthetic lines are much less prone to kinking or sudden springback—unlike steel cable. 6. Finishing the Job Release the tension, detach shackles and the anchor. Reinstall winch covers and stow the remote. If using a wireless remote, keep it off the ground to prevent accidental operation. Always leave a moderate tension on the final wraps for next use. Advanced Tips for Power and Safety Winch Capacity Drops With Each Layer: Maximum pulling power is available only on the first wrap. As layers stack, effective pull decreases (e.g., a winch rated for 12,000 lbs delivers less than 10,000 lbs on the third layer). Plan your recoveries accordingly. Double-Line Pull: For heavy vans or deeply bogged rigs, use a pulley (snatch block) to double your pulling power and reduce winch strain. Regular Inspections: Before and after every trip, inspect your synthetic winch line for UV damage, abrasion, or contamination—replace if there’s any doubt. Why Trust  Owl With Your Recovery Gear? At Owl we don’t just sell winch upgrades—we install, test, and rely on them in the field. Our selection of premium winches, synthetic ropes, UV covers, and trail-proven recovery kits ensure your Sprinter or Grenadier is adventure-ready and reliable when it counts. Off-roading rewards precision and preparation. Spend the extra 20 minutes to spool your winch line properly, and you’re investing in the safety, reliability, and capability of your adventure rig for years to come.
Read more
Cheap Vs Expensive: What is the Best Traction Board?

Cheap Vs Expensive: What is the Best Traction Board?

If you’re passionate about exploring off the beaten path with your Van or Grenadier then, you already know that getting stuck is more a matter of “when” than “if.” The right traction boards are an essential tool—not just Instagram-worthy rooftop cargo, but the difference between a quick recovery and calling it quits before the real adventure begins. Whether you’re planning to cross sandy washes in Baja, dig out of a mountain snowstorm, or tackle muddy backroads, here’s what you need to know about choosing the best traction boards for your rig, drawn from our hands-on experience and deep product knowledge. What Are Traction Boards and Why Do You Need Them? Traction boards—often called by their brand name “Maxtrax”—are engineered mats made to give your vehicle the grip it needs when tires are spinning in sand, mud, or snow. Unlike a winch, they don’t require another anchor point or a second vehicle; they’re straightforward, fast, and highly effective recovery tools. Situations where traction boards shine: Deep sand traps at the beach or desert. Slippery snow patches in the mountains. Muddy trails after rain when the ground turns to soup. Any low-traction scenario where even airing down doesn’t do the trick. Your first line of defense should always be airing down your tires—reducing pressure expands your tire footprint and often gets you unstuck. If your van has a locking differential, use it. But when both fail, quality traction boards are what you’ll reach for, whether you’re pulling yourself out or helping someone else on the trail. Cheap vs. Premium Traction Boards: Not All Are Created Equal On the surface, most traction boards look similar. But when you’re relying on them under a 10,000-lb van, the differences quickly become stark and expensive. Let’s break it down: Amazon/Economy Traction Boards Pros: Low price, easy to find, often mimic the look of premium models. Cons: Inferior plastic degrades quickly under UV exposure (they fade from black to dull gray). Lack UV-stabilization, becoming brittle and prone to micro-cracks or outright snaps. Plastic “nubbins” designed for grip wear down fast—especially under heavy vehicle loads. Real-World Issue: After regular use with a heavy adventure van, the traction points can wear flat or shear off completely, making them nearly useless just when you need them most. Maxtrax Pros: Industry gold standard; robust plastic, well-engineered and thoroughly tested. Outstanding UV stability for long-term reliability when mounted externally. Smart, effective nub design for grip. Highly compatible with popular mounting systems and pins (Maxtrax and compatible brands). Cons: Price: Around $300 or more for a pair—but you get what you pay for. Still all-plastic: Even quality plastics will become more brittle with age and exposure. Summary: Maxtrax have earned their reputation for a reason. If you want proven reliability for standard rigs, this is a solid, if pricey, choice. ActionTrax (Our Top Choice for Modern Vans) Pros: American-made with a clever hybrid design: UV-stable, ultra-flexible plastic plus strategically placed steel traction teeth. Teeth are bolt-through, replaceable, and sited where tire spin is most intense—these things bite. Extreme flexibility lets boards conform to uneven terrain—critical when digging out from a rut, mound, or awkward rock. Steel teeth simply can’t be worn down by even the heaviest van tires—true long-term durability. Fits the same mount spacing and pins as Maxtrax, making upgrades seamless. Cons: Slightly pricier than Maxtrax, reflecting their premium materials and labor-intensive construction. Summary: For heavy adventure vans and real off-road work, ActionTrax are tough to beat. Their blend of flexibility, longevity, and mechanical grip make them the standout in challenging environments. What Matters Most When Choosing Traction Boards 1. Material & UV Resistance UV exposure is the #1 killer of cheap plastics. Faded, chalky boards crack and fail when you need them most. Spend more upfront for UV-stable formulations—ActionTrax and Maxtrax both excel here. 2. Traction Surface Board nubs (or pins) are where the action happens. All-plastic? Great—until they wear flat. Replaceable steel studs, as seen on ActionTrax, handle aggressive tire lugs and heavy loads without wearing down. 3. Flexibility vs. Rigidity Don’t be fooled by “stiff equals strong.” Ultra-rigid boards easily fracture under van weights. Some flex helps boards mold to the terrain and absorb stress. ActionTrax wins here again: more flexibility means better conformity and less breakage over time. 4. Mounting Compatibility Stick with boards that fit standard pin mounts (Maxtrax-compatible). This lets you mix and match as preferences change, or easily upgrade. 5. Realistic Use Cases For Sprinter Vans or Grenadiers, you rarely need four boards—two quality boards paired with smart driving, a locker, and recovery points are enough for 99% of situations. Common Myths and Mistakes Myth: “Traction boards can bridge holes or gaps.” Reality: They’re not bridges. Use them only for traction under tires, not as ramps over voids (especially with heavy vans). Mistake: Leaving boards mounted in the sun year-round without rotating them. Tip: If you must leave them outside, check for brittleness and swap position occasionally. How to Use Traction Boards Like a Pro Dig Out: Use the serrated end as a shovel to clear a smooth path ahead of the tire. Insert Deep: Stuff the board under the spinning tire as far as possible to maximize bite. Pair Up: Place a board under each driven wheel—especially if you don’t have a locking differential. Gentle Throttle: Apply power smoothly. Spinning out will just kick the boards away (or eat through them). Don’t Cross Gaps: Never use them as makeshift ramps or bridges. Why We Recommend ActionTrax and Maxtrax After countless miles (and too many stuck recoveries to count), we stock both Maxtrax and ActionTrax because they deliver. For most van owners, Maxtrax are proven. For those pushing the limits, hauling more weight, or serious about long-term reliability, ActionTrax are the upgrade you didn’t know you needed: more grip, more longevity, and total compatibility with your existing mounts. Ready for Adventure? Get the Gear That Won’t Let You Down Whether you’re running a full recovery setup or just prepping for your next dispersed camp, don’t cheap out on traction boards—your adventures depend on them. We’ve field-tested what’s out there and carry only the gear we trust on our own vans.
Read more