Upgrade Your Camping Experience with the Owl Trax Table for Sprinter
Today, we’re diving into a product that’s perfect for Sprinter Van owners: the Owl Trax Table.
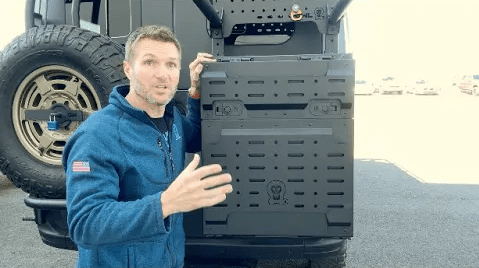
This isn’t just any table; this is a piece of innovation designed with the Sprinter Van lifestyle in mind. At Owl, we’ve been working on this for a while, and we’ve even patented it, so you won’t find anything like it elsewhere. What makes the Trax Table so special? It uses otherwise unused space on your Sprinter Van, turning it into a functional and versatile workspace.
The Design and Features
First off, the Trax Table is crafted from stainless steel, which means it’s food-grade and ready for all your cooking needs. It even has a clever cutting board that slides out from underneath the table. Picture this: you're out on the road in your Sprinter Van, and you need to chop some veggies for dinner. No problem! The cutting board slides out easily, giving you plenty of space to prepare your meal. There are also hooks built into the design to hang your tongs or other cooking tools, plus two spots to hold your cups while you prep.
One of the standout features is the table’s drip rail, designed to catch any spills—whether it's juice from tomatoes or anything else. This small but thoughtful detail makes cleaning up a breeze.
Easy Setup, No Fuss
Another reason the Owl Trax Table is perfect for Sprinter Van adventurers? It’s incredibly easy to set up. The table flips down when you’re ready to use it and locks securely into place when you’re done. Thanks to the smart design, including brackets that attach to the van’s track, the table stays put. It’s so stable, you could even drive off-road with the table attached (though we don’t recommend keeping it on during highway driving).
We’ve also added an extra bracket to prevent your van door from swinging too far open and hitting the table. This small but essential feature means you can keep your table extended and accessible without worrying about damaging it or your van.
Perfect for Adventure and Practical Use
The Owl Trax Table is perfect for anyone who uses their Sprinter Van for more than just transportation. Whether you’re prepping a meal at a campsite, using the table as a workspace, or just needing a spot to set your coffee, the Trax Table fits seamlessly into your van lifestyle. When it’s time to pack up, the table folds up easily and compactly. It’s designed to stow away without taking up much space inside your Sprinter Van, making it an ideal accessory for those who value efficiency and practicality.
One last note: the bamboo cutting board will have a darker, stained finish when it reaches you. The prototype we used for testing was unstained, but the final version will be even more polished and beautiful, adding that final touch of quality to an already well-engineered product.
Elevate Your Sprinter Van Experience
In summary, the Owl Trax Table is not just a simple accessory—it’s a game changer for Sprinter Van enthusiasts. Its design, convenience, and attention to detail make it an invaluable addition to any adventure. So, whether you're exploring new trails, setting up camp, or just enjoying some downtime by the van, the Trax Table is ready to make your life easier and more enjoyable.
Get ready to take your Sprinter Van adventures to the next level with the innovative and practical Owl Trax Table!
Remember, if you have any questions, our van experts are standing by at all times. Give us a call at (866) 695-8267, and we'll be happy to help. No call centers, no out-of-state representatives - just our van experts at our HQ in Arizona.
Read more